Changing the contents of an XML-based JTree
The following example is to show you how to work with JTrees based on XML. It demonstrates
1. how to add XML elements to a JTree
2. how to remove XML elements from a JTree and
3. how to modify the screen presentation of an XML-based JTree.
This is done
1. by using of the SpeedJG XML classes, and
2. by means of an XMLTreeModel implementation based on the W3C DOM.
First of all, a few words regarding the XML implementation within the SpeedJG GUI builder. This tool uses its own XML Document Model. The most important class of this implementation is the XMLElement, representing the node of an XML structure. But this class doesn't know anything about JTrees. The JTree-Model implementation in SpeedJG is done by the XMLDocumentTree class. So beware when manipulating the visible structure of an XMLElement that is held by an XMLDocumentTree; you have to do this through the XMLDocumentTree and not directly on the XMLElement because in the latter case no tree listeners will be notified.
To begin with our example, please open the Project File Examples.gpr from the SpeedJG install directory and select the frame myBookshelf.
- Press the Generate View Java Code button on the tool bar and save the generated code into a file named MyBookshelf.java.
- Press the Generate Controller Java Code button on the tool bar. Accept the default listener recommendations and save the generated code into a file named MyBookshelfController.java.
Customizing the generated Source Code
To customize the source code according to our needs to show the expected results we only have to make changes within the
MyBookshelf.java file and there only within the model class MyBookshelf.
The generated view code (MyBookshelfGUI) and controller code (MyBookshelfController)
remain unchanged. Thus, if you modify the layout of your GUI with SpeedJG and re-generate the code, your individually added code lines
handling the GUI access remain untouched and valid because SpeedJG by default only overwrites the previously generated view and
controller code.
First, add the following import statements at the beginning of the MyBookshelf.java file because we need these for some methods we will call later on.
import speed.util.*;
import java.awt.event.*;
import javax.swing.tree.*;
import javax.swing.event.*;
Next, add the instance variable XMLDocumentTree xmlTreeModel,
and replace the generated declaration and instantiation code lines of the model class MyBookshelf from:
public class MyBookshelf
{
  public MyBookshelf()
  { GUIObject gui = new MyBookshelfGUI();
    //MyBookshelfController controller = new MyBookshelfController(gui);
    JFrame frame = (JFrame) gui.getComponent("myBookshelf");
    frame.show();
  }
...
to:
public class MyBookshelf extends MyBookshelfController
{ XMLDocumentTree xmlTreeModel;

  public MyBookshelf()
  { super(new MyBookshelfGUI());
    myBookshelf.show();
  }
...
To react on the selections within the JTree we add some convenient methods that support us from within our application:
-
Provide the Node that is currently selected within the tree.
XMLElement getSelectedTreeNode() { TreePath selectionPath = bookshelfTree.getSelectionPath(); if (selectionPath != null) { Object[] path = selectionPath.getPath(); if (path.length > 0) { return (XMLElement)path[path.length - 1]; // last node ... } } return null; } -
Select a definite Node within the tree.
void setSelectedTreeNode(XMLElement node) { TreePath treePath = new TreePath(xmlTreeModel.getPathToRoot(node)); bookshelfTree.setSelectionPath(treePath); bookshelfTree.scrollPathToVisible(treePath); } -
Analyze a Node and show its contents within the GUI. This method also enables / disables the action buttons for further processing of the data.
void showNodeContent(XMLElement nodeElement)
{ xmlTextArea.setText(nodeElement.asXMLString());
  xmlTextArea.setCaretPosition(0);
  String xmlNodeName = nodeElement.getName();
  btnAdd.setEnabled(xmlNodeName.equals("Bookshelf"));
  btnChange.setEnabled(xmlNodeName.equals("Book"));
  btnRemove.setEnabled(xmlNodeName.equals("Book"));
  if (xmlNodeName.equals("Book"))
  { tfPrice.setText(nodeElement.getAttribute("Price"));
    tfTitle.setText(nodeElement.getElement("Title").getValue());
    taDescription.setText(nodeElement.getElement("Description").getValue());
  }
  else
  { tfTitle.setText(null);
    tfPrice.setText(null);
    taDescription.setText(null);
  }
}
At last, to make our example run, we have to overwrite some methods inherited from the controller class MyBookshelfController.
-
Instantiate a new XML tree model and assign it to our JTree when starting the application.
void initialize() { xmlTreeModel = new XMLDocumentTree(new XMLElement("Bookshelf")); bookshelfTree.setModel(xmlTreeModel); } -
Create a new XML node from the GUI input fields and add this node to the tree when pressing the Add Button. Afterwards select this node within the tree.
void handleBtnAddActionPerformedEvent(ActionEvent e) throws Exception { XMLElement currentSelection = getSelectedTreeNode(); if (currentSelection != null) { XMLElement newBookElement = new XMLElement("Book"); newBookElement.setAttribute("Price", tfPrice.getText()); newBookElement.addElement(new XMLElement("Title") .setValue(tfTitle.getText())); newBookElement.addElement(new XMLElement("Description") .setValue(taDescription.getText())); xmlTreeModel.addXMLTreeNode(currentSelection, newBookElement); setSelectedTreeNode(newBookElement); } } -
Change the contents of the currently selected XML node with the contents of the GUI input fields when pressing the Change Button.
Afterwards refresh the contents of the input fields.
void handleBtnChangeActionPerformedEvent(ActionEvent e) throws Exception { XMLElement bookElement = getSelectedTreeNode(); if (bookElement != null) { bookElement.setAttribute("Price", tfPrice.getText()); bookElement.getElement("Title").setValue(tfTitle.getText()); bookElement.getElement("Description").setValue(taDescription.getText()); xmlTreeModel.fireTreeNodeChanged(bookElement); showNodeContent(bookElement); } } -
Remove the currently selected XML node from the tree. Afterwards select the root node of the tree.
void handleBtnRemoveActionPerformedEvent(ActionEvent e) throws Exception { xmlTreeModel.removeXMLTreeNode(getSelectedTreeNode()); setSelectedTreeNode((XMLElement)xmlTreeModel.getRoot()); } -
Show the contents of the XML node that is selected within the tree.
void handleBookshelfTreeValueChangedEvent(TreeSelectionEvent e) throws Exception { Object[] path = e.getPath().getPath(); if (path.length > 0) { showNodeContent((XMLElement)path[path.length - 1]); } } -
Exit the application.
void handleExitMenuItemActionPerformedEvent(ActionEvent e) throws Exception
{ System.exit(0);
}
If you want to test and experiment with this example you have to obtain the following files:
| XML Tree Edit Application Files | |
|---|---|
| SpeedJG.jar |
Contains the classes GUIObject and XMLDocumentTree. Download and un-zip the SpeedJG.zip file and place the SpeedJG.jar file on your CLASSPATH. |
| MyBookshelf.java | Generated by SpeedJG and modified within this example. |
| MyBookshelfController.java | Generated by SpeedJG. |
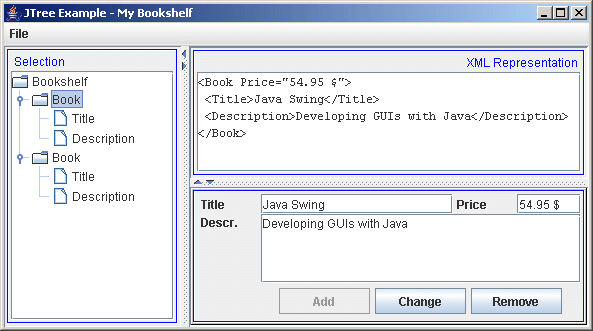
When executing this program it will look like the following screenshot:

This works fine but doesn't look spectacular. So what we will do to make it look smarter is
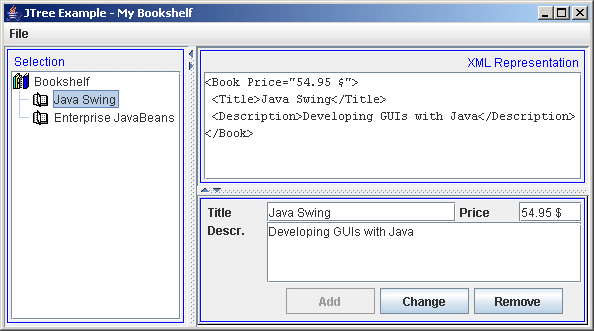
- provide different icons for the bookshelf and book entries.
- display the individual title of a book entry instead of the "Book" element name.
- filter the sub-elements of a book entry to be considered within the JTree.
The first two points will be carried out by sub-classing the DefaultTreeCellRenderer implementation of JTree. The last point can be handled by implementing an XMLTreeNodeFilter than can be passed to the SpeedJG XMLDocumentTree.
In this example we solve all this within one class:
class XMLTreeCellRenderer extends DefaultTreeCellRenderer
                          implements XMLTreeNodeFilter
{ private ImageIcon[] XMLTreeIcons =
  { new ImageIcon(GUIObject.getImageResource("/images/misc/BookShelf18.gif")),
    new ImageIcon(GUIObject.getImageResource("/images/misc/Book18.gif"))
  };

  // implementing the XMLTreeNodeFilter interface
  public boolean isVisibleXMLTreeNode(XMLElement node)
  { String xmlNodeName = node.getName();
    return (xmlNodeName.equals("Bookshelf") || xmlNodeName.equals("Book"));
  }

  // rendering the tree
  public Component getTreeCellRendererComponent(
    JTree tree, Object value, boolean sel,  boolean expanded,
    boolean leaf, int row,  boolean hasFocus)
  { super.getTreeCellRendererComponent(
      tree, value, sel, expanded, leaf, row, hasFocus);
    String name = ((XMLElement)value).getName();
    if (name.equals("Bookshelf"))
    { setIcon(XMLTreeIcons[0]);
    }
    else if (name.equals("Book"))
    { setIcon(XMLTreeIcons[1]);
      setText(((XMLElement)value).getElement("Title").getValue());
    }
    return this;
  }
}
The images loaded by this class reside in the SpeedJG.jar file.
The isVisibleXMLTreeNode(...) is called by
the XML tree model to figure out what nodes should be presented within the tree.
The getTreeCellRendererComponent(...) is called by
the JTree to figure out how the nodes should be presented within the tree.
To activate the XMLTreeCellRenderer in our example
program add the following instructions to the initialize method:
void initialize()
{ xmlTreeModel = new XMLDocumentTree(new XMLElement("Bookshelf"));
  bookshelfTree.setModel(xmlTreeModel);
  XMLTreeCellRenderer renderer = new XMLTreeCellRenderer();
  xmlTreeModel.setTreeNodeFilter(renderer);
  bookshelfTree.setCellRenderer(renderer);
}
Compile and run the program again. Now you have an extensively customized JTree based on XML.

To run this example from your computer you have to obtain the following files:
| XML Tree Edit Application Files (Version-2) | |
|---|---|
| SpeedJG.jar |
Contains the classes GUIObject and XMLDocumentTree. Download and un-zip the SpeedJG.zip file and place the SpeedJG.jar file on your CLASSPATH. |
| MyBookshelf.java | Generated by SpeedJG and modified within this example (Version-2). |
| MyBookshelfController.java | Generated by SpeedJG. |
The Bookshelf Application Tree based on the W3C DOM
If you prefer a tree model that works together with all current implementations of the W3C DOM, or if you want to build an application without the need to include classes from the SpeedJG.jar file, you can also use the XmlTreeModel and XmlTreeNodeFilter we have provided for these purposes, and is works similar to the SpeedJG XMLDocumentTree.
To adapt our example above, we first have to modify the import statements at the beginning of the MyBookshelf.java file, and make the following changes:
| from | to |
|---|---|
... import speed.jg.*; import speed.util.*; ... |
... import javax.xml.parsers.*; import org.w3c.dom.*; ... |
Also comment out the following import statement at the beginning of the MyBookshelfController.java file:
...
//import speed.jg.*;
...
Next we have to declare the following instance variables
-
XmlTreeModel xmlTreeModel;
that references our new DOM based tree model, and -
Document xmlDocument;
that references a specific implementation of a DOM Document.
public class MyBookshelf extends MyBookshelfController
{ XmlTreeModel xmlTreeModel;
  Document xmlDocument;
...
The renderer class we used in the previous example now has to filter and outline DOM-based Nodes as follows:
class XmlTreeCellRenderer extends DefaultTreeCellRenderer
                          implements XmlTreeNodeFilter
{ private ImageIcon[] XMLTreeIcons =
  { new ImageIcon(Toolkit.getDefaultToolkit().getImage("BookShelf18.gif")),
    new ImageIcon(Toolkit.getDefaultToolkit().getImage("Book18.gif"))
  };

  // implementing the XMLTreeNodeFilter interface
  public boolean isVisibleXmlTreeNode(Node node)
  { if (node instanceof Element)
    { String name = node.getNodeName();
      return (name.equals("Bookshelf") || name.equals("Book"));
    }
    return false;
  }

  // rendering the tree
  public Component getTreeCellRendererComponent(
    JTree tree, Object value, boolean sel,  boolean expanded,
    boolean leaf, int row,  boolean hasFocus)
  { super.getTreeCellRendererComponent(
      tree, value, sel, expanded, leaf, row, hasFocus);
    String name = ((Node)value).getNodeName();
    if (name.equals("Bookshelf"))
    { setText(name);
      setIcon(XMLTreeIcons[0]);
    }
    else if (name.equals("Book"))
    { NodeList nodeList = ((Node)value).getChildNodes();
      for (int i = 0, n = nodeList.getLength(); i < n; i++)
      { Node childNode = nodeList.item(i);
        if (childNode.getNodeName().equals("Title"))
        { setText(childNode.getFirstChild().getNodeValue());
          break;
        }
      }
      setIcon(XMLTreeIcons[1]);
    }
    return this;
  }
}
The two variables declared before are instantiated within the initialize method, and the tree renderer / filter will also be assigned here:
void initialize()
{ try
  { DocumentBuilderFactory factory = DocumentBuilderFactory.newInstance();
    DocumentBuilder builder = factory.newDocumentBuilder();
    DOMImplementation impl = builder.getDOMImplementation();
    xmlDocument = impl.createDocument(null, "Bookshelf", null);
    xmlTreeModel = new XmlTreeModel(xmlDocument.getDocumentElement());
    XmlTreeCellRenderer filterAndRenderer = new XmlTreeCellRenderer();
    xmlTreeModel.setTreeNodeFilter(filterAndRenderer);
    bookshelfTree.setModel(xmlTreeModel);
    bookshelfTree.setCellRenderer(filterAndRenderer);
  }
  catch (ParserConfigurationException ex)
  { throw new RuntimeException(ex.getMessage());
  }
}
At last, we have to change all the methods that interact with the new DOM tree used now, to work with this changed implementation:
-
Provide the Node that is currently selected within the tree.
Node getSelectedTreeNode() { TreePath selectionPath = bookshelfTree.getSelectionPath(); if (selectionPath != null) { Object[] path = selectionPath.getPath(); if (path.length > 0) { return (Node)path[path.length - 1]; // last node ... } } return null; } -
Select a definite Node within the tree.
void setSelectedTreeNode(Node node) { TreePath treePath = new TreePath(xmlTreeModel.getPathToRoot(node)); bookshelfTree.setSelectionPath(treePath); bookshelfTree.scrollPathToVisible(treePath); } -
Analyze a Node and show its contents within the GUI. This method also enables / disables the action buttons for further processing of the data.
void showNodeContent(Node nodeElement) { xmlTextArea.setText(nodeElement.toString()); xmlTextArea.setCaretPosition(0); String xmlNodeName = nodeElement.getNodeName(); btnAdd.setEnabled(xmlNodeName.equals("Bookshelf")); btnChange.setEnabled(xmlNodeName.equals("Book")); btnRemove.setEnabled(xmlNodeName.equals("Book")); if (xmlNodeName.equals("Book")) { tfPrice.setText(((Element)nodeElement).getAttribute("Price")); NodeList nodeList = nodeElement.getChildNodes(); for (int i = 0, visibleIndex = 0, n = nodeList.getLength(); i < n; i++) { Node childNode = nodeList.item(i); if (childNode.getNodeName().equals("Description")) { taDescription.setText(childNode.getFirstChild().getNodeValue()); } else if (childNode.getNodeName().equals("Title")) { tfTitle.setText(childNode.getFirstChild().getNodeValue()); } } } else { tfTitle.setText(null); tfPrice.setText(null); taDescription.setText(null); } } -
Create a new XML node from the GUI input fields and add this node to the tree when pressing the Add Button. Afterwards select this node within the tree.
void handleBtnAddActionPerformedEvent(ActionEvent e) throws Exception { Node currentSelection = getSelectedTreeNode(); if (currentSelection != null) { Element newBookElement = xmlDocument.createElement("Book"); newBookElement.setAttribute("Price", tfPrice.getText()); Element childElement = xmlDocument.createElement("Title"); childElement.appendChild( xmlDocument.createTextNode(tfTitle.getText())); newBookElement.appendChild(childElement); childElement = xmlDocument.createElement("Description"); childElement.appendChild( xmlDocument.createTextNode(taDescription.getText())); newBookElement.appendChild(childElement); xmlTreeModel.addXmlTreeNode(currentSelection, newBookElement); setSelectedTreeNode(newBookElement); } } -
Change the contents of the currently selected XML node with the contents of
the GUI input fields when pressing the Change Button.
Afterwards refresh the contents of the input fields.
void handleBtnChangeActionPerformedEvent(ActionEvent e) throws Exception { Node currentSelection = getSelectedTreeNode(); if (currentSelection != null) { Element bookElement = (Element)currentSelection; bookElement.setAttribute("Price", tfPrice.getText()); bookElement.getElementsByTagName("Title") .item(0).getFirstChild() .setNodeValue(tfTitle.getText()); bookElement.getElementsByTagName("Description") .item(0).getFirstChild() .setNodeValue(taDescription.getText()); xmlTreeModel.fireTreeNodeChanged(currentSelection); showNodeContent(currentSelection); } } -
Remove the currently selected XML node from the tree.
Afterwards select the root node of the tree.
void handleBtnRemoveActionPerformedEvent(ActionEvent e) throws Exception { xmlTreeModel.removeXmlTreeNode(getSelectedTreeNode()); setSelectedTreeNode((Node)xmlTreeModel.getRoot()); } -
Show the contents of the XML node that is selected within the tree.
void handleBookshelfTreeValueChangedEvent(TreeSelectionEvent e) throws Exception
{ Object[] path = e.getPath().getPath();
  if (path.length > 0)
  { showNodeContent((Node)path[path.length - 1]);
  }
}
If you want to test and experiment with this example you have to store the following files into a directory of your choice and subsequently compile them:
| W3C DOM-based Bookshelf Application Files | |
|---|---|
| GUIObject.java | Superclass of all view classes generated by SpeedJG. |
| MyBookshelf.java | Generated by SpeedJG and modified within this example (Version-3). |
| MyBookshelfController.java | Generated by SpeedJG. |
| XmlTreeModel.java | TreeModel for XML Documents that are implemented according to the W3C DOM standard. |
| XmlTreeNodeFilter.java | Filter interface to be implemented by classes that interact with the XmlTreeModel. |


|
Images shown in the tree. |
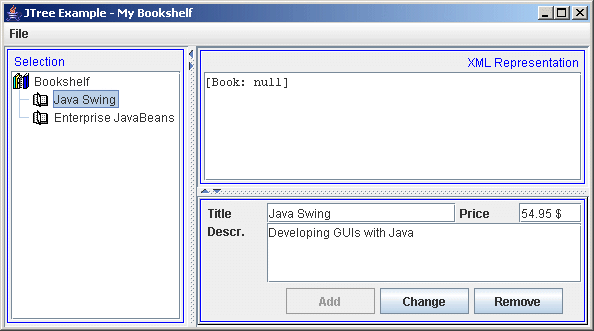
If you execute this example you will see that the XML Representation
in the JTextArea does not show the results as in our example compiled with the SpeedJG XMLDocumentTree:

This is because we use the Node.toString()
method, whose result depends on the DOM implementation you use. If you use a DOM Level 3
implementation you can attach a DOMWriter
that outlines the XML structure for you.
Copyright © 2003 Wöhrmann Softwareentwicklung - Munich Germany